Dev blog #137
28.10.2016
Hello Everyone!
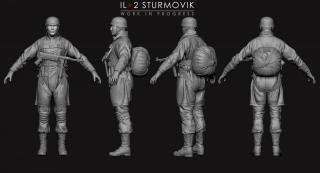
Let's start the today’s diary with a screenshot. This time you see the WIP model of a German Fallschirmjäger (paratrooper) in summer clothing for the new Ju-52 Collector plane which is now in the final development stage.

Last Friday we began alpha-testing of a new version which includes DirectX 11. First results are promising; FPS has increased significantly even in cases when not all optimizations were included. Of course, some issues have presented themselves, but we have no doubts that debug will go smooth and release will not be too long. At the moment, work on transferring to DirectX 11 has included:
- 90 shaders were transferred to DX11 format
- Forest rendering was optimized thanks to using of constant buffers;
- Buildings rendering was optimized thanks to using of constant buffers;
- Complex 3D models rendering was optimized
- Complex 3D models export to game format was optimized, it has reduced model separation during export, in final it provides additional performance in scenes with complex combat;
- SSAO was replaced by TSSAO, this has shrunk expenses for this effect calculation;
- Grass rendering was optimized due to implementation of occlusion check;
- Water reflections were optimized;
- Lighting model was optimized due to using of 5th shader's model, also shadows from point lights (like flare rocket) were added;
- Lighting algorithm evolution to TiledShading 2.5D was performed, it's also due to using of 5th shader's model
- Memory usage on landscape rendering was reduced thanks to new possibilities of DX11, in perspective this allows to increase landscape poly-count by 4 times;
- HDR visual was improved on lower graphics presets.
Our work on using and implementation of new abilities provided by DirectX 11 is underway, in closest schedule there is adaptation of several technics to Compute Shaders, realization of Open VR API and other "yummy" things :)
So, our transferring to DirectX 11 is going as planned. We plan to finish this work by the end of this year; and Open VR API support should be completed by the end of the January.
Beside DirectX 11 news, I would like to talk with you about a part of flight-simulation realism which affects the most important part of the sim – the role of a virtual pilot.
To provide a maximum realistic virtual flight at your home on your PC, the developer should create the most plausible, natural and balanced visual picture of the world, airplane and cockpit on the player's monitor as possible. After that, the developer should provide a realistic control system for the airplane and the airplane should respond to this control system on the player’s PC as realistically as possible (this is what everyone calls the Flight Model). Also, the developer should create a realistic sound environment with all the small touches and accents which will make player to believe that he or she is in the airplane. After all this, the developer should create scenarios where the player will perform the role of a virtual pilot. Plus, there is a big bunch of other items which are related to air combat, but they require a separate and a big talk. The assembly of all these factors presents the aviation simulator to the player - a tool, a virtual reality instrument to be plunged into where the player becomes a pilot.
But, as in any kind of game, after plunging in the virtual atmosphere of the game world, it is also very important how seriously the player treats his role. Young boys who play war in a courtyard in torn trousers with wooden sticks instead of rifles in their hands may feel a much greater degree of immersion than an adult man playing airsoft in full authentic NATO gear with an authentic copy of an M-16 rifle in his hands. It may feel false because there is talk about work and family around him or jokes or maybe alcohol is being consumed. This does not feel like real combat even if he has authentic equipment and a gun. The intention was to play “army man” right? The same thing may happen in a multiplayer match in a flight-sim. When a player plays the single-player game than he completely determines the atmosphere and the mood which he has when he enters the game. If he has sat down to play the flight-simulator to simply “kid around and play some tricks" than it does not matter how realistic this simulator is - the player will not come close to reality. If he has sat down to play the role seriously - to perform some kind of combat task, to make a transfer flight from one airfield to another, to do some aerobatics, or maybe to perform a training flight in the same manner as performed by real pilots than his level of immersion will be high. But even in this case of a simple, but realistic objective - to perform a simple training mission close to reality - it contains a great challenge for virtual pilot because to perform it he has to find out how it is performed in reality. The question becomes - how to manage plane controls correctly to perform it by himself? To be successful the player has to do it many times before he will start to have success. Maybe after practicing for 1, 2 or 3 evenings he will be able to perform this training flight like it was performed by real pilots.
I do not know how many of you I have captured by this long introduction, but if I did, then I'm offering you to try to perform a training circling flight flying the MiG-3 fighter plane. A mission kit, with flight records of the circling pattern in calm winds and takeoffs and landings in strong winds are attached. Also here is a small video-lesson with my comments (I apologize for my English even before you have started to watch it :) ) and a video-example of takeoffs and landings in heavy wind conditions. I invite you to try these training scenarios. The necessary technique of these training flights are explained below.
Start at parking area, full fuel and ammo load. Winds calm, weather is clear.
Part 1: Start and Taxi to the runway
- Set altimeter pressure equal to airfield pressure
- set Throttle to Idle, execute engine start procedure
- Engine started: set engine revolutions to 100%, mixture to 50%, radiators to 50%
- Set flaps limiter to 20%, extend landing flaps
- Look around for taxi clearance, set throttle to 50%, start to roll
- Rolling started: hold wheel brakes to check them, release brakes to continue taxiing
- Set throttle to 35...40% to continue taxiing
- Use wheel brakes for sharp turns and to stop
- Do not exceed speed 20 km/h and brake down to 5 km/h before sharp turns
- Taxi with opened canopy, move your head left and right to look forward beyond the nose
- Look around for obstacles and other planes, especially when taxiing to runway
Part 2: Takeoff
- Set Throttle to Idle
- Look around for takeoff clearance, close canopy, move view point to the left side of cockpit to have better visibility forward
- Hold Wheel Brakes, push Left Rudder pedal to 2/3 (rotate joystick twist to left to 2/3)
- Hold Rudder at 2/3 to left, hold Stick in center, set Throttle to 80%
- Release brakes, set Throttle to 100%
- Keep take off direction by Rudder adjustments - a little bit more and less than 2/3 to the left
- To keep the takeoff direction: keep your eye on an object far ahead (a tree, a building, a cloud and so on), check runway left/right borders only sometimes
- Continue to speed up with stick in center, keep direction by rudder pedals, plane’s tail will rise by itself
- When speed is more than 180 km/h: smoothly pull the airplane nose up, plane will take off, keep the nose slightly above the horizon, altitude and speed should continue to increase
- To bank use the control stick, smoothly the return rudder pedals neutral position
- When altitude is 20 m: raise the landing gear, keep the nose pointed a few degrees above the horizon
- When speed is 200 km/h: retract the flaps, keep the nose pointed a few degrees above the horizon
- When altitude is 100m: start 90° left turn to course 228°, bank angle should be 30°
- When altitude is 400m: push the nose down to just a little bit above the horizon, keep vertical speed =0 m/s and altitude =400 m
- When speed is 300 km/h: set throttle to 55% and maintain it
- Start second 90° left turn to course 138°, bank angle is 30°
Part 3: Circular flight
- When left turn to course 138° is completed: continue in a straight-line maintaining 400 m altitude and speed 300 km/h
- Maintain required speed by keeping the throttle near 55%, speed corrections should be performed by slight throttle deviations from 55%
- Maintain required altitude by controlling plane nose position over the horizon. Keep the nose a bit higher than the horizon, remember it's position which is providing zero vertical speed
- When flying straight constantly check the airspace around you, control landmarks to start 3rd turn in the right place
- To control oil temperature (from 40°С to 80°С) and water temperature (from 80°С to 110°С), adjust the radiator shutters angle if it is necessary
- When range to the airfield is 4...5 kilometers: start a 180° turn to the left for course 318° which will line you up for landing, bank angle is 30°
- During the turn control the airplane’s nose position over the horizon, vertical speed =0 m/s, altitude =400m, speed =300 km/h, landing course =318° approaching
Part 4: Final approach and landing
- When 3rd turn is finished: set Throttle to 0%
- When speed is less than 300 km/h: extend landing gear
- Pay attention to vertical speed =0 m/s, altitude =400 m
- When speed is less than 250 km/h: extend flaps to maximum
- When speed is 220 km/h: push the throttle to 80% to maintain this speed
- When runway distance is 2.5 km: set Throttle to Idle, push nose down a little lower than the runway threshold
- Descend to the runway beginning at 210...200 km/h, in best case the throttle should be at idle during descent
- When altitude is 30...50m: start to slightly pull up the nose to reduce speed while the plane slowly sinks towards the runway
- Move your view point to the left, keep your eye on the ground to the left of the nose, feel the altitude slowly decrease
- When altitude is almost zero: keep flying while losing speed and pulling the nose up, but don't allow the plane to climb
- Touchdown: keep rolling straight forward, keep your eye on a point or object far ahead (a tree, a building, a cloud and so on)
- When speed is 100 km/h: pull the stick fully backward, hold your brakes, keep rolling straight forward
- When the plane has stopped: retract the flaps, open the canopy, taxi to taxiway at 20...40 km/h
- Move out from the runway by the closest taxiway, perform taxi to parking area at 20 km/h, turn off the engine
Specific flying notes in the case of head wind:
- In case of head wind there is no difference in case of calm winds on take-off
- In case of head wind you got to start descending to the runway a bit later and keep descend aiming point a bit further
- No difference in touchdown and braking in case of calm winds
Specific flying notes in the case of wind from the left:
- Take off requires less left pedal pushing in the case of wind blowing from the left, in the case of 12 m/s it's becomes unnecessary to use the pedals to stay straight
- Airfield should be seen to the right from the airplane nose all the way of approach
- There are slower winds at lower altitudes, so wind-compensation nose side-angle to airfield should decrease when airplane is descending
- Airplane should perform a smooth touchdown to prevent circling
- Rudder should be a bit pressed to the right before touchdown to decrease skidding
- If airplane have touched down smoothly than maximum attention should be put on keeping the direction using far-away landmarks
- It's not recommended to land the airplane in conditions of cross-wind more than 5 m/s
Specific flying notes in the case of wind from the right:
- Take-off becomes harder in case of wind blowing from the right and requires more left rudder deflection
- It's not recommended to takeoff in right wind more than 5 m/s conditions
- Airfield should be seen to the left from the airplane nose all the way of approach
- There are slower winds at lower altitudes, so wind-compensation nose side-angle to airfield should decrease when airplane is descending
- Airplane should to perform a smooth touchdown to prevent circling
- Rudder should be a bit pressed to the left right before the touchdown to decrease skidding
- If airplane have touched down smoothly than maximum attention should be put on keeping the direction using far-away landmarks
- It's not recommended to land the airplane in conditions of cross-wind more than 5 m/s